Writing Our Own Operating System (Part-1)
October 1, 2022
Read on MediumWhat is an Operating System?
Operating System is the most important software of all the software running in a system. It acts as a bridge between the other application software and hardware devices. It also does a whole lot of functions such as memory management, managing computer’s devices and establishing a user-interface. The operating system consists of two parts mainly the kernel and the system programs. The Kernel does all the heavy lifting of the OS, and the first program loads when the PC starts up. System programs are the ones which run on top of the kernel and are used to connect the kernel to peripheral devices and user applications
Writing an operating system is not an easy task by all means as it’s a very complex system we don’t even know where to start. So, what we are going to do is build the OS in small parts with the help of the book, Little OS Book. In This section, we will cover how to implement OS and boot. Even though the ones we develop will be very primitive it can help us to build modern operating software easily and understand operating systems more deeply
Step 01 — Installation of Virtual Box and Ubuntu
I’m going to use Ubuntu which is installed on the virtual machine to develop our operating system. The Virtual Box can be downloaded from their site easily. Virtual Box is used to run multiple operating systems in a host computer the reason why we use Virtual Machine instead of a host machine is we can run our code very conveniently in a virtual machine instead of a physical computer as starting an OS in a virtual machine is much faster than getting it in a physical machine
After installing the virtual box, we have to get our Ubuntu Operating system running. As ubuntu is an open-source software we can download it easily from the internet. Ubuntu is very easy to install and use. Now we can finally move to implement our OS in the next section

Step 02 — Setting up the environment
Once the installation is complete, we have to install some packages such as build-essentials, nasm,genisoimage and bachs .each packages provide us with some essential functionalities build essentials are the packages which help us to compile the operating system we built .it include many libraries and tools such as GNU debugger, g++/GNU compiler collection. nasm is used to compile assembly programs,genisoimage is used to generate iso images and Boch is an emulator which helps to develop OS. Emulators are software that can help us to run the operating systems we built without crashing/affecting the host system
The terminal command we use to install packages is
sudo apt-get install build-essential nasm genisoimage bochs bochs-sdl
Step 03 —The booting process
To understand how to develop an operating system works, we have to know how an operating system starts, it is carried out by a process called booting. The boot process helps the operating system to take control by a series of small programs which are more powerful than each before. The most common programs in the booting process are bios, bootloader, and OS
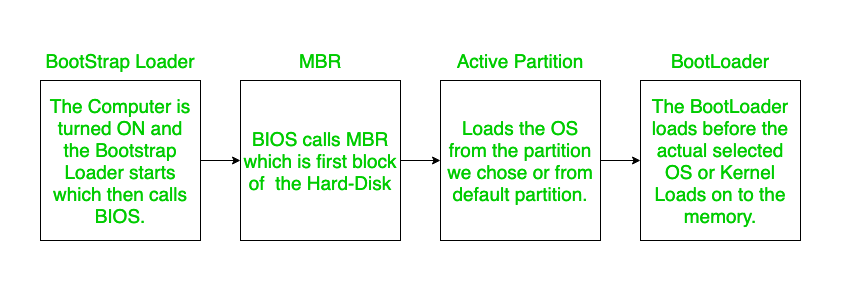
BIOS — When the computer is turned on the first program loaded is BIOS. This program is normally kept on the PC’s motherboard on a read-only memory chip it helps to do the early diagnostics of the hardware of the system after the complete diagnostics it transfers the control to the boot loader
Bootloader — The bootloader’s job is to transfer the control of the computer to the operating system. the bootloader is divided into two parts, primary and secondary. the job of the primary bootloader is to make hardware initializations and transfer the control to the secondary bootloader and the secondary bootloader will transfer the control to the OS. There might be a question about why we need two bootloaders instead of one, it is due to the hardware restrictions and other limitations
Operating System — The bootloader hand over control to the OS by jumping into a specific address in the memory. The bootloader will look for a certain memory address to make sure that it runs into the address of the operating system and not some random arbitrary code once the bootloader completes this process the OS takes control of the whole computer
However, because doing so would require writing a lot of low-level code that communicates with BIOS, we will not be creating our own bootloader for this project. So, we’ll use a bootloader that already exists: the GNU GRAND Unified Bootloader (GRUB). The operating system can be created using GRUB as an executable file with the extension “. ELF,” which GRUB will load into the appropriate region in memory.
The next step is to save the next section of the following code inside the loader.s file. You can manually create files inside the directory where your operating system will be located or use the terminal to do so.
https://medium.com/media/ea9d52bbcf2c522227516e3a36b0589f/hrefAs this OS primitive, we will only write the very specific number 0xCAFEBABE to the EAX register. We can check if the number has successfully been written to the register once we boot the OS up.
With the following command, the file loader.s can be converted into a 32-bit ELF [18] object file:
nasm -f elf32 loader.s
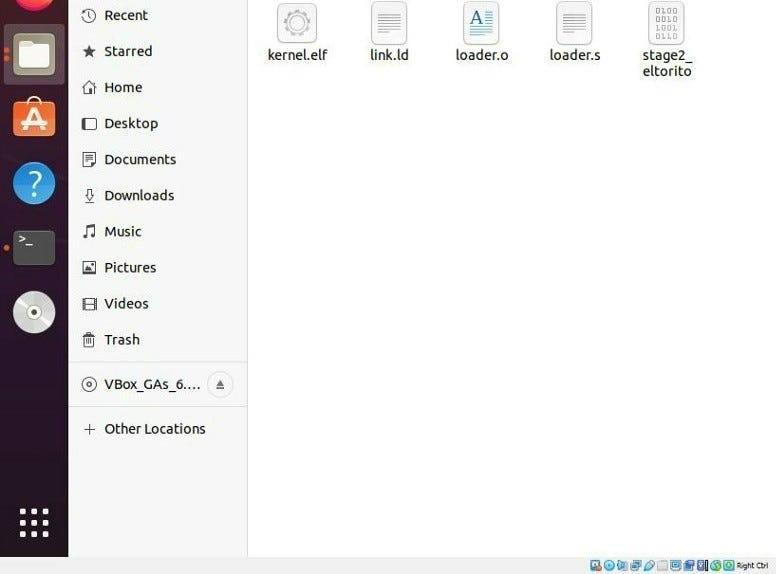
Now we can see a file named ‘loader.o’ in your working directory.
Step 04 —Linking
Now the bootloader has to load the kernel into the memory after the compilation of the above code. we can use the following script as the linker. We have to save the following script inside link.ld file and execute the command below in order to link the file.
https://medium.com/media/829359c9ae2d5eba475b2604097fb37c/hrefld -T link.ld -melf_i386 loader.o -o kernel.elf
Now there will be a file called kernel.elf inside the directory, after that we have to download GRUB Legacy stage2_eltorito binary file which will be our bootloader for the implementation.
Step -5 Creating ISO Image
Now we have to create a kernel ISO image with the program genisoimage . The files that will be on the ISO image should be placed in a folder. To create the folder and copy the files to their correct locations, use the following commands:
mkdir -p iso/boot/grub              # create the folder structure
cp stage2_eltorito iso/boot/grub/   # copy the bootloader
cp kernel.elf iso/boot/             # copy the kernel
A configuration file for GRUB must be produced in order to tell GRUB where the kernel is located and to define specific settings
https://medium.com/media/50e00c06aec370882bf5906f80bb4d02/hrefWe should place the file menu.lst inside the folder iso/boot/grub/. after all the process our file directory should look like this
iso
    |-- boot
      |-- grub
      | |-- menu.lst
      | |-- stage2_eltorito
      |-- kernel.elf
after that use the following code segment to generate iso image
genisoimage -R                              \
                -b boot/grub/stage2_eltorito    \
                -no-emul-boot                   \
                -boot-load-size 4               \
                -A os                           \
                -input-charset utf8             \
                -quiet                          \
                -boot-info-table                \
                -o os.iso                       \
                iso
It will produce a “os.iso” file. This includes the configuration file, the GRUB bootloader, and the kernel executable.
Step 06 — Running in Boch Emulator
Now we can use the Boch emulator to run our OS System using the image we created but before that, we have to create a configuration file to start the Boch Emulator. You can use the following simple configuration and save it as bochsrc.txt file in the directory
https://medium.com/media/9140131907bccb01d60070c2bf675bc9/hrefNow if we execute the following command in the terminal, we can see the emulator in action
bochs -f bochsrc.txt -q
the Boch should be able to run by now after that place a command called continue in the terminal and we can see some text inside the emulator after that we can quit the emulator and we can display the log produced by Boch by executing the following command:
cat bochslog.txt
Now, somewhere in the output, the information from the CPU registers that Bochs copied should show up. If we can see RAX=00000000CAFEBABE or EAX=CAFEBABE in the output, then our OS has successfully booted.
And this concludes our first article of series of articles about the implementation of our own OS. We can further develop our OS in the next week
Reference:
- The Little OS Book: https://littleosbook.github.io/book.pdf
2. http://duartes.org/gustavo/blog/post/how-computers-boot-up